 OfferAlly
User guide · Version 0.2.0
From setup
to a useful first test.
Activate your account and check your audio, then test the assistant. Job-profile details, a CV and a question bank are optional: start with general answers and add preparation later.
Updated October 7, 2026. This guide describes the 0.2.0 release candidate. Check your downloaded app version; older releases have different controls.
Windows x64 · Interview
Captioned product tour
An illustrated tour using actual app screenshots with fictional examples. The test screenshots show Ready states with empty results. This is not a recording of a completed live workflow.
Starts paused, with no audio. Previous and Next change steps. Use the progress slider’s arrow keys to move through the tour. Your reduced-motion preference keeps the tour in manual mode.
Illustrated guidance
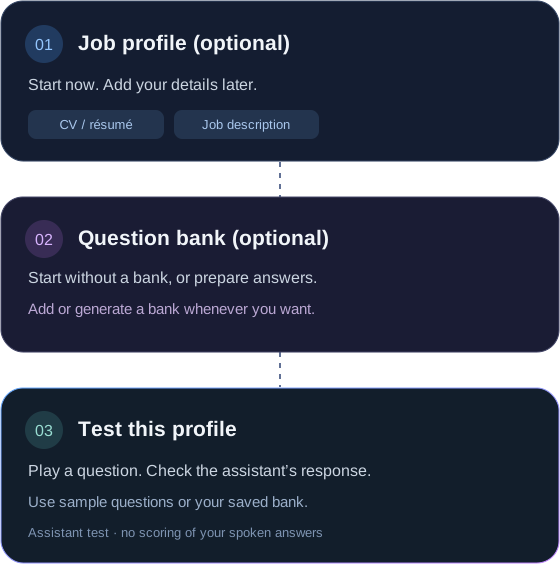
Start with audio, add preparation later
- A fresh installation starts with a blank Interview 1 profile.
- In Audio Setup, choose the output device your question audio will use.
- Without your details, expect general suggestions and check every answer.
Step 1 of 7
Start with audio, add preparation later
Caption
Activate your account, choose your speakers or headphones, and start in Interview. A separate profile, CV, job description and question bank are optional.
Captions stay visible. You control the pace; moving between steps pauses playback.
1. Download and open OfferAlly
For the 0.2.0 release candidate, use a currently supported Windows 11 (x64) release and the offline package. “Offline package” means the runtime is included; AI features still need the internet.
- Create an account on offer-ally.com and open My account. Download the recommended Windows package from your dashboard.
- Extract the ZIP into a folder you can keep and locate OfferAlly.Windows.exe. Verify its publisher as described below before opening it. Do not run it inside the ZIP.
- Before opening the executable, right-click it, choose Properties, then Digital Signatures. Open the signature details, check that Windows reports a valid signature, and compare the publisher with the official release details. If the signature is missing, invalid or the publisher is unexpected, stop and contact support. An unsigned internal test build has not passed this public-release check.
- For the 0.2.0 compact release, install the .NET 10 Windows Desktop Runtime (x64). Older 0.1.2 compact downloads use .NET 8. Check the version beside your download.
- Windows 10 compatibility is limited to supported editions and requires validation for your exact edition and build. The 0.2.0 app requires build 19041 or later; older LTSC builds do not meet that requirement. Do not assume every Windows 10 installation is supported.
- If Windows blocks the file, confirm its source, release version and published checksum before proceeding. Contact support if you cannot verify it; do not disable Windows security.
Check before continuing: You can open the app and its Settings window.
2. Activate and check audio
Your account dashboard contains your personal license key and credit balance. A CV, job description and question bank are not required to complete setup.
- Copy your license key from My account. Paste it into the app’s license field and save.
- Read the first-run consent information before enabling audio capture. Only use live assistance where transcription and assistance are permitted.
- The app starts in Interview with a blank default profile called Interview 1. You can leave your CV, job description and Q&A bank empty and start after activation and audio setup. Add these details later if you want more personal answers.
- In Audio Setup, use Speakers or headphones to select the same output device used by your interview audio. The menu shows Windows device names; microphones are listed separately. Play a short clip or the test question and check the level meter.
- If your selected device is unavailable, reconnect it and choose Refresh, or select another device. Refresh keeps your saved selection. Save Changes after choosing a different device and repeat its audio test.
- Use headphones when possible. Test the actual headset or speakers you plan to use; reconnecting a device can change the Windows default.
Check before continuing: The license is accepted and the audio meter responds to sound from your selected output.
3. Add a job profile (optional)
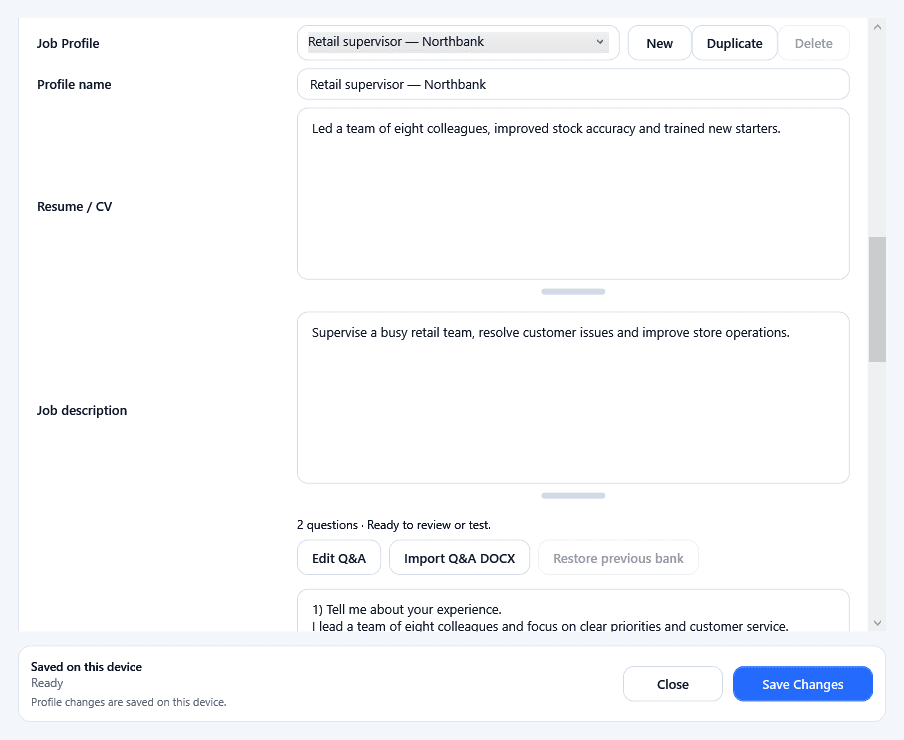
You can skip this entire step. Start without creating or filling a job profile; without your details, responses are general suggestions. Add your CV and job description later for more personal answers. Each job profile keeps its own preparation on this device.
- To skip, keep the blank Interview 1 profile and continue to Test this profile. A CV, job description and question bank are optional. Check every answer and never present invented or hypothetical examples as your own experience.
- To add a profile later, find Job Profile in Settings and choose New. Enter a recognizable Profile name such as “Company — Analyst”.
- Paste your CV or résumé into Resume / CV and the role requirements into Job description. New starts blank so another employer’s context is not carried across.
- Choose Save Changes. Select another profile and return to confirm the name and details are correct.
- Use Duplicate when you intentionally want to reuse existing material. Review every field before using the copy for another job. Deleting a profile removes its saved preparation; keep a backup first.
- If Save Changes reports that another window changed your profiles, keep your edits in the encrypted recovery copy and reopen Settings to review the latest saved profiles. An older recovery copy opens for review; copy any text you need into the latest profile before saving. Close older app versions before editing profiles.
Check before continuing: Either keep the blank default profile and continue, or confirm that each job profile retains its own details when you switch.
4. Add a question bank (optional)
You can skip this entire step. Without a bank, OfferAlly generates answers using the question and your available profile context. Add prepared answers later if you want more control over specific responses.
- To skip, leave Q&A bank empty, choose Save Changes and continue to Test this profile. The test offers three sample questions, or you can start permitted live assistance. Each new AI answer uses one credit.
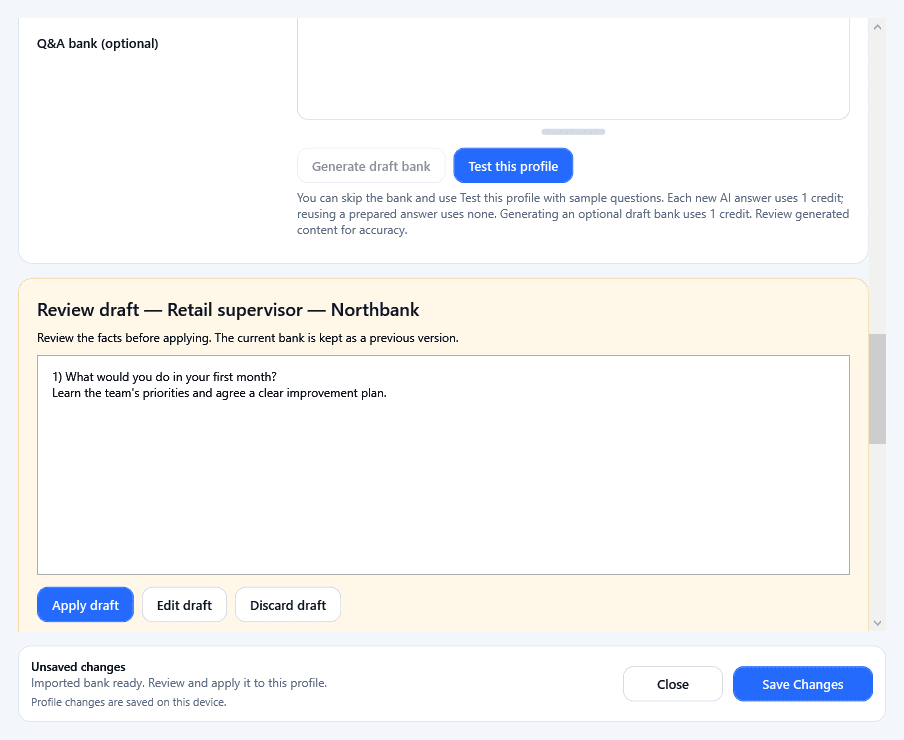
- In Q&A bank, add question-and-answer pairs yourself, or use Import Q&A DOCX for an existing document. Imports also open a review draft; apply it only after checking the entries.
- To make an AI draft, first add your CV and job description, then choose Generate draft bank. This is a new generation and uses one credit.
- Review draft shows the proposed content separately. Use Edit draft to correct the facts, wording and examples. Discard draft leaves your existing bank in place.
- Choose Apply draft only when you want to replace this profile’s bank. Use Edit Q&A for individual entries, or edit the raw bank text. Choose Save Changes to save your changes.
- If you need to undo a replacement, use Restore previous bank. Keep a separate backup for older versions; this is not unlimited version history.
Q1. Tell me about a time you improved a process.
Answer: Describe your real situation, your responsibility, the steps you took and the result. Replace this example with your own facts.
Check before continuing: Either leave the bank empty and continue, or confirm that every saved answer belongs to this role and your actual experience.
5. Test this profile
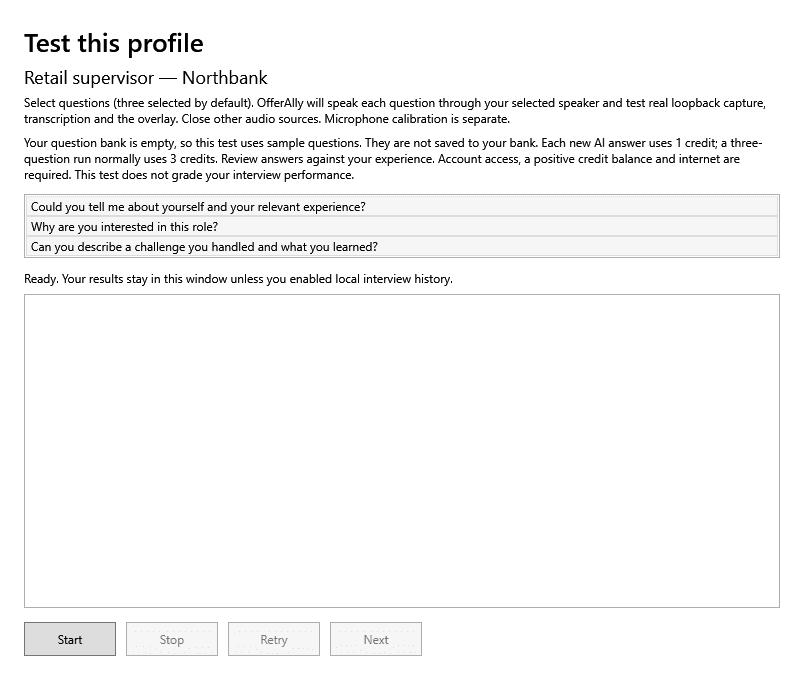
Test the assistant with the blank default profile or your own preparation, with or without a question bank. This checks audio and responses; it does not grade or coach your spoken interview answers.
- Keep the default Interview 1 profile or select a profile you've prepared, then choose Test this profile. The app saves any selected preparation first. A CV, job description and question bank are not required.
- With a bank, select your saved questions. With an empty bank, three sample questions are selected for you. They are only used for the test and are not saved to the bank. Each new AI answer uses one credit; reusing a prepared answer uses none.
- Choose Start. OfferAlly speaks a question through your selected output device and waits for the assistant’s response. A full three-question sample run normally uses three credits.
- Compare what was spoken and heard, then review the returned answer against your experience. With no profile details, expect general suggestions. Do not treat invented or hypothetical examples as facts about you. If you use a bank, also compare its saved reference. Check that the selected profile is being used.
- In the overlay, Saved answer identifies wording retrieved from your question bank. AI draft identifies a new generated response, including responses that use prepared notes as context. Check its facts before using it; the label is not a factual-accuracy check. These labels remain with earlier answers when you scroll back.
- Use Retry to repeat a question, Next to move on, and Stop to end the test. A new generated answer uses a credit; directly reusing a prepared answer does not.
- If a response is wrong, stop and review that profile’s CV, job description and any optional prepared answers, then test again. Fix audio problems in Audio Setup before a real call.
Check before continuing: The assistant uses the intended profile with saved or sample questions. Review every generated answer for accuracy.
6. Pre-interview checklist
Run this short check with the computer, output device and job profile you will use on the day.
- Confirm that transcription and AI assistance are permitted for the conversation. Check the organizer’s rules before starting capture.
- Keep the blank default profile or select the Job Profile you prepared. Check any CV, job description and prepared answers you added, then choose Save Changes and confirm the saved status.
- If you added prepared answers, review them for accuracy. Replace placeholders and remove claims that do not describe your own experience. You can leave the bank empty.
- Check your internet connection, activation and credit balance. Prepared-answer retrieval uses no generation credit; a new AI answer uses the normal credit charge.
- Under Speakers or headphones, select the same output used for the call. Run Test this profile with three saved or sample questions; an empty bank is fine. Compare what was spoken and heard, confirm the answering profile, and check each returned answer.
- Stop the test before the real conversation. Resolve device or transcription errors first. If you change the profile, bank or output device, run the test again.
Check before continuing: Your preparation is saved, all three questions use the intended profile, and the test is stopped.
7. Understand credits
New accounts receive 10 trial credits. The public credit pack is £19 GBP for 300 credits, paid once, without expiry.
- One new AI generation uses one credit, including a draft bank request. Listening and idle time do not use generation credits.
- Live transcription requires account access and a positive credit balance. The app streams audio directly to Deepgram. Up to two app speech sessions can be active per account, and the app reconnects after 30 minutes. Close unused capture sessions and reconnect when prompted. Listening does not spend generation credits.
- A direct match to an existing prepared answer does not require a new generation. The mock test can use credits when a fresh answer is needed.
- Check your balance in My account. Open Billing to review purchases. Refund requests are handled only by email to info@offer-ally.com; include your account email, purchase reference and reason. A payment return can take a short time to sync.
- If an error occurs, wait for the app’s status before starting another generation. Contact support with the approximate time and error message if you believe credits were charged incorrectly. Never send your full license key.
Check before continuing: You understand whether the next action will create a new answer or reuse saved material.
8. Decide what to save
Job profiles are saved locally. Relevant questions and context are sent to the service and its providers for transcription or generation.
- Save interview history on this device is an opt-in setting. Leave it off if you do not want local interview transcripts and generated responses saved.
- Turning history off does not delete files already saved. Review and delete existing history separately using the app’s history location.
- Generated responses are available for retry or replay for 24 hours, then become unavailable and are removed by hourly cleanup. Minimal billing and idempotency records remain.
- Optional website analytics and advertising measurement have separate consent choices under Cookie settings. Declining them does not prevent use of your account.
- Read the Privacy Policy for support chat, service providers, data requests and retention details.
Check before continuing: You know whether local history is enabled and which data leaves your device.
9. Troubleshoot common problems
Start with the symptom rather than changing every setting.
- No sound level: check the selected Windows output, app volume and headset connection. The sound must play through the device selected for loopback capture.
- No useful response: confirm the selected job profile and internet connection. A bank is optional; review it if you added one. Test one simple question again.
- Invalid license or no credits: copy the key again from the same account, remove spaces and check the dashboard balance. An exhausted balance is different from an invalid key.
- Speech session or request limit reached: stop other OfferAlly capture sessions, wait for old sessions to expire and retry. A question bank does not change these limits. An update-required message means you need the current desktop release before reconnecting.
- Wrong job’s content: stop the test, select the intended Job Profile, check Resume / CV, Job description and the bank, save, then retest.
- Payment succeeded but balance is unchanged: refresh My account after a short wait and check Billing. Use the dashboard help card or Help button to chat with Ally, or email info@offer-ally.com for human support if it remains unresolved. Refund requests must be made by email.
- If damaged settings prevent startup, open Terminal in the app folder and run .\OfferAlly.Windows.exe --export-support-bundle. The app prints the new ZIP location. For a custom settings file, also supply --settings-path followed by its quoted path.
- Check the reported bundle mode before sharing it. Recovery mode includes only basic app/system details and the failure category; it omits settings, drafts and logs. Standard mode includes diagnostic logs, which you should review before sending. Export does not repair your files.
- Screen sharing: capture behavior varies by Windows version and video-call platform. Never rely on an invisibility guarantee or use the app to conceal prohibited assistance.
Check before continuing: If you need help, share app version, Windows version, the action you took and a redacted error message.
10. Back up, update or remove the app
Your preparation is valuable. Preserve it before moving folders, updating or removing a portable installation.
- Close OfferAlly before backing up its local settings and history. The settings file may include your license, CV and job descriptions; keep the copy private.
- The default settings file is .offerally_settings.json in the app’s working folder. A custom --settings-path or OFFERALLY_SETTINGS_PATH can select another location. Keep the settings file together with its .bak previous-save backup and all .profiles-draft recovery files, including copies with an extra identifier after that suffix. Each Settings window keeps its own encrypted copy. Do not upload these private files to support.
- Protected settings and recovery drafts are tied to your Windows account. Copying them to a different Windows account or machine is not a portable profile transfer. Keep a separate private copy of your original CV, job description and answer-bank document. The activation file is stored separately at %APPDATA%\OfferAlly\config.dat.
- If the app reports that settings cannot be read or decrypted, leave the original file in place and keep a private copy. Use the original Windows account, or restore a known-good settings backup after closing the app. Do not replace the file with an empty one; contact support if you are unsure which backup is safe.
- For a new release, download from the official site, verify the version, then follow its update notes. Reopen your profiles and run Test this profile after updating.
- For a portable ZIP installation, close the app and remove its extracted folder when no longer needed. Check the configured settings and history locations separately if you want to remove all local data.
- Removing the app does not delete your website account. Use the account controls or contact support for account and data requests.
Check before continuing: Your backup is secure, and an updated app still opens the correct profiles.